The cream of my latest adventures!

Latest

Eagle Safari Photos, with the Eagle Man


In May this year I went to Lauvsnes, Flatanger, somewhere in the middle of Norway. There lives the man they call the Eagle Man, who has a special relationship with the eagles in the area. I went with my dad and the eagle safari trip was a Christmas present from our spouses. It was time for some eagle photography!

The Eagle Man (Ole Martin) would take us out in his boat in the early morning and then another trip in the evening, so that we’d get the best possible light when photographing the eagles. When we arrived at the different territories the eagles would come to the boat and circle above us. Ole Martin would then throw out a fish, which the eagles dived down to catch. This is what we experienced and captured on camera; photos of diving eagles.

As the fish was thrown out, the eagle would first circle above the boat, in order to get the right angle. It would attack the fish against the wind, so the boat was positioned thereafter.

_MG_1772

The eagle is scanning the area for fish


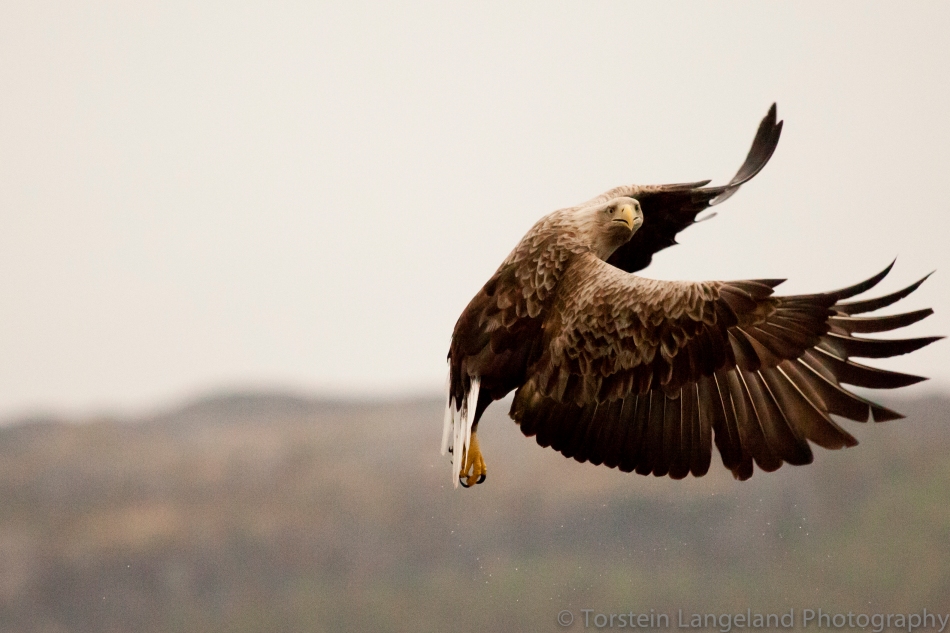
_MG_1174

“Hey buddy, what are you looking at?”


The eagle would then dive in towards the water…

_MG_1687

One eagle getting ready to grab its prey. This is a classic eagle diving photo.

_MG_1065

Eagle incoming! This one is really coming straight on the fish. We saw less of this type of dive, and more of the kind you can see in the photo above.


…and then grab the fish lying there… with a vengeance. It was really fascinating to see the determination in the eagle’s eyes, as it was grabbing the fish in the water.

_MG_1048

Look at the big determined eyes, staring at the prey which is milliseconds from being grabbed.


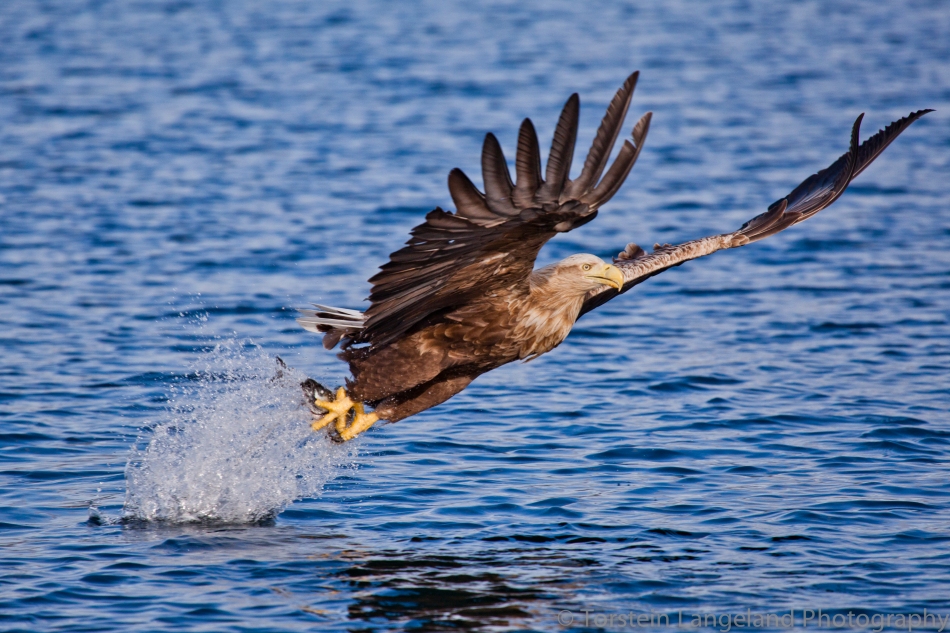
Some of the most fascinating shots came after the dive, when the eagle had caught the fish and needed to get back up in the air. It would throw its wings forward, as you can see in the photos, creating a very nice shot with the fish and the water splashing.

_MG_1754

The eagle looking majestic after just having caught the fish, and now has to get back up in the air.


_MG_1194

You need a bit of photographer’s luck to see the eagle’s face in this position. More often than not the face will be covered by its wings.


_MG_1777

This is arguably my favourite shot. The eagle bounces up and forward after grabbing the fish.


I highly recommend taking a trip in the Norwegian fjords with the Eagle Man. It’s a once in a lifetime (unless you go back of course) experience for both photographers and people interested in nature. Check out the Eagle Man website. Also see the rest of my selected eagle photos.

Porsche 928 Photoshoot


This last weekend I went out to photograph my colleague´s Porsche 928, a 1987-model which he has imported from Sweden. The challenge was to get some photos that could go into the Norwegian Porsche Classic magazine.

I brought the Canon 5D MkII with the 24-105mm lens for wide angles and 70-200mm lense for details. The challenge was to find a good location with a cool background which brought out the best from the Porsche.

Location #1 was in an underpass which with tagged up walls – the perfect scenario for an urban feel. The combination of urban feel and black & white high contrast look gave good results. Here are some of the results:

Porsche 928 from behind

A Black & White photo of the Porsche´s back-end. By zooming in with the 24-105mm lens I made the car look even more bulky than it was, and a bit more square. Focal Length: 105mm, Aperture: F4, Shutter: 1/125s, ISO: 400

Porsche 928 from the side

The Porsche 928 from the side, with the tagged wall as a background. The vignetting gives the photo an extra cool look and helps put the car in the context of its surroundings. Focal Length: 24mm, Aperture: F4, Shutter: 125s, ISO: 800

After finishing in the underpass we went to the IKEA parking lot, which was deserted because it´s Sunday (yes, IKEA is closed on Sundays in Norway!). A combination of B&W and coloured photos, but again I prefere B&W!

Porsche 928 from front

The Porsche from the front, with its special round headlamps. We used a trolley shed as background which worked well. Focal Length: 105mm, Aperture: F8, Shutter: 1/125s, ISO: 100

Porsche 928 Interior Photo

HDR Interior photo from the 928. The interior was in great condition with special edition seats. Nice! I used a narrow aperture to get the required depth. Focal Length: 24mm, Aperture: Various, Shutter: Various, ISO: 400

HDR Porsche 928 Photo

Another HDR, using 3 photos. I did this to capture the details of the clouds whilst not under exposing the car. Combine it with black & white and you get a very cool photo. Focal Length: 24mm, Aperture: Various, Shutter: Various, ISO: 160

These are just a few of the shots I took. Go to my Smugmug site to check out the rest. Enjoy!

Gloomy and Starry Nights


The latest news is that my wife and I have moved from the UK to Norway! It´s been going great and we´re both getting down and dirty with our jobs.

Moving to Norway also gives great new opportunities for photography. Stunning landscapes, plus my dad´s cabin which is a very nice and dark location for starry night shots.

We went to the cabin this Easter – 2011 – and I brought the Canon 5D MkII, my tripod and three lenses on the trip:

  • 24-105mm
  • 70-200mm
  • 50mm

I brought the 50mm to make the camera light and easy to carry when I was shooting my wife learning how to ski. She really improved during our stay this Easter! For the starry photos I used the 24-105mm Canon lens which gives excellent colours and quality, plus the widest angle of the 3 lenses – perfect for capturing the stars!

It took me this trip to realise that I needed to replace the Canon RC-1 remote control with a new one after losing the old one (or leaving it on location and not bothering to go pick it up). So I have now bought the Canon RC-6 which basically has the same functions – it just looks slightly different.

For the shoot I mainly used a 30 second shutter speed, which is the max you can go to (as I know) without using bulb mode. I could not use bulb mode as it would cause camera shake when pressing the button (hence why I´m replacing the remote). I put it on a 2 second timer with mirror lockup, both reducing vibration in the tripod which was fixed in the snow. Mirror lockup puts the mirror in the right position before the shutter actually opens, removing even more vibration, making the photo clearer.

Stars with cabin in foreground

Dark and moody photo of the stars with the cabin in front. The cabin is lit up by a small flash light I brought outside - handy! Focal Length: 24mm, Aperture: F4, Shutter: 30s, ISO: 2000

As you can see in the above photo I had to go with a high ISO of 2000 to get a bright enough photo within the 30s shutter speed. If you want it brighter without increasing the ISO you either need a wider aperture or longer shutter speed. Fortunately the Canon 5D MkII is reasonably kind on high ISOs.

This next photo is part of a series of photos I used for a star trail shoot (see below). On this shot I needed to boost the ISO even further, to 4000, to get sufficient brightness and take advantage of the little remaining light left from the sun, which already had set a while ago. Other than this settings were consistent with the previous photo.

Starry Night in Rindalen

The orange purple colour combination affected by a sun which has set a while ago. Focal Length: 24mm, Aperture: F4, Shutter: 30s, ISO: 4000

Finally, the jewel of the night. Star trails are normally created by very long shutter speeds of 5 minutes and more. Don´t have a remote? Stitch together several 30 second shots, which I have done here using a Lightroom plugin called Enfuse. Enfuse is especially designed for merging HDR photos and star trails, and the results look good. Check it out!

The below photo is stitched together using 26 virtually equal photos, but showing the trail of the stars, which actually do move quite quickly although it doesn´t seem like it when you look at the stars. With the 2 second timer, mirror lockup and tripod mounted in the snow, I managed to capture enough photos to make this star trail photo.

Star trail photo

Star trail stitched together using 26 photos with the same settings as the previous photo I used the Enfuse plugin for Lightroom. Focal Length: 24mm, Aperture: F4, Shutter: 30s, ISO: 4000

I hope you liked the shots. I will return with more star trails using my new remote. So watch this space!

Abstract Fireworks in Singapore


Here’s a quick post with some photos I took of fireworks in Singapore Chinese New Year 2011. They’re taken with my 5D MkII and 24-105mm Canon lens.

I generally went for a 4 second shutter speed for these shots, with a narrow aperture at F11-22.

With a standard lens as you’ve guessed the photos have somewhat been cropped to give the effect of the fireworks filling the frame.

Abstract Fireworks 1

Amazing fireworks from Chinese New Year celebration in Singapore 2011. 24mm, Aperture: F22, Shutter: 4s, ISO: 400

Abstract Fireworks 2

A slightly different selection of fireworks, still at a 4 second shutter speed to get that great light trail effect. 24mm, Aperture: F11, Shutter: 4s, ISO: 400

These are the shots I felt qualified from the Singapore fireworks photoshoot. It was a very rainy day so we were lucky that it cleared up just in time for midnight. However that meant we didn’t have sufficient time to find the optimal vantage point. I will next year try to spend even more time finding the perfect spot to capture the fireworks in front of the Marina Bay Sands Hotel in Singapore.

New Year’s Eve Fireworks Photos from Trondheim


Like every year, New Year’s Eve is celebrated in my home town of Trondheim, Norway. This year was spent quietly with my wife and not at a wild party, so I took the opportunity to get some shots of the fireworks (which alcohol has prevented in the past… I must be getting old!). The photos below are shot from a tripod, using 3.2-5 seconds exposure and low ISO. I have, and you will most likely get disappointed if you shoot fireworks with short exposure, and you can’t just show up with your hand held compact camera or SLR and expect to get 1st class photos.

Firstly, you’ll have to use a high ISO which will make the photos grainy and less detailed. Secondly, you can normally maximum manage to keep the camera still for 1/20 seconds max, even with image stabiliser. When taking photos of fireworks I much prefer to include the firework from it’s lit until it explodes in the air, hence the tripod is a must!

I brought my Canon EOS 5D MkII with the 24-105mm lens. I also brought my 70-200 but didn’t fancy switching lenses in the cold. I therefore focused on the nearby fireworks, rather than the official ones by the government.

Fireworks in Trondheim

Fireworks shot from the Steinan area of Trondheim, along Steinanvegen. 105mm, Aperture: F4.5, Shutter: 5s, ISO: 125

Taking photos of fireworks is all about trying and failing. Unless you have the perfect setup and know exactly when the fireworks will come from a particular location, a big part of getting the right shot is luck. 90% of the photos are likely not to have much going for them, and with the fireworks normally just lasting for 10 minutes you just need to find the ideal frame and keep shooting!

And now a quick ad… Need a photographer? Hire me!

JKSA7CWVJTKH

Weekend Break in Prague


The wife invited me for a relaxing weekend break in Prague just as the winter was starting to set in, from 27th to 29th November 2010. They had 20 degrees in the previous week but this weekend, which was the beginning of the Prague Christmas Market, and the lighting of the christmas tree, had -7 degrees. So we dressed up with super wool underwear, wool and cotton socks, mountain walking shoes, and our winter coats. Whilst my wife’s coat is made for winter, mine just looks really warm and the wind goes straight through the zipper. I therefore had to add even more clothes underneath – the most layers I had during the weekend was four.

We left from Manchester Airport (the most illogically constructed airport i’ve ever been to) on the Saturday morning with BMI Baby. With BMI Baby you have to pay extra to sit together so I was placed one row behind my wife. I really hate it when they place you apart just so you’ll pay more to sit together. There were many others sitting alone with empty seats where WE could have sat. Anyways, rants aside, the about 1 hour 50 minutes flight went reasonably smooth and we arrived in Prague early afternoon.

My wife looking around the airport

When you exit Prague airport you’re met by loads of yellow cabs, just like in New York, but these were VW Passats. I’m sure the yellow cabs must have monopoly on picking up people on the airport as the average cab in the city was a lot more… old? Alot of Skodas, which after all was a Czhech brand of car before it was bought by VW.

Outside Prague Airport

We weren’t picked up by a yellow cab but by the driver from the hotel Mamaison Suite Hotel Pachtuv Palace. He also drove a Passat, but an unmarked one.

Our driver in the mirror taking us to our hotel, Pachtuv Palace, and that’s me in the back seat.

My wife had chosen the most amazing hotel, which was situated right on the river with a view of Charles Bridge. Pachtuv Palace is a suite hotel so we had a sink, microwave and toaster (not that we used any of these these), as well as a big bed and a very nice bathroom. Apparently this was the place Mozart once was held hostage back in the days.

Our bathroom had everything you need to survive

After settling in we quickly got ready to go out and explore the city. After discussing with the hotel staff which restaurants we should visit, we totally disregarded their advice and headed off to a place we had researched in advance. We didn’t want touristy food so had researched places that served more traditional Czhech food. The place of choice was Mlejnice. It had mixed reviews (mainly great but also some bad) but we were certain the negative reviews came from people who would more enjoy Mc Donalds or one of the many shops selling pizza, and were determined to try the local. The Mlejnice restaurant pulls in about 50/50 tourists and locals.

We arrived and the place had a very homely and grounded feel. There was a little wait, so the very kind locals in front – David and his girlfriend – invited us to sit with them at their table.  It was great to talk to normal locals who are not guides or trained in tourism.

Our new friends in Prague

David works in security and has experienced the horror of hosting football games against England/Scotland. He also told us about his travels to North Korea and how he was one of 50 guests to the country each year and was one of 10 people staying in a 500+ capacity luxury hotel. If you’re interested to find out more, ask me.

After dinner we went to see the Christmas tree being lit… but we were late and this was the view that met us:

Our view of the Prague Christmas Tree

Our view of the Prague Christmas Tree

Mamaison Suite Hotel

Lesson learnt: If you go to see the Christmas tree being lit at the Prague Christmas market and take some nice photos of it, make sure you get there early and don’t get stuck in a side narrow side street.

Anyways, we did get to see the Christmas tree finally!

Prague Christmas Market Christmas Tree

Prague Christmas Market Christmas Tree

After checking out the tree we found some really interesting tubular dough based food that we needed to try. It’s called Trdlo and is dough wrapped around a stick, added sugar and baked over the fire. Below are some Trdlo photos – by the way it tastes very nice. You should try!

Trdlos being baked over an open fire

Trdlos being baked over an open fire

My wife and her newly acquired Trdlo

My wife and her newly acquired Trdlo

Trdlo Sign

Look for the characteristic Trdlo Sign next time you’re at the Prague Christmas market!

After the Trdlo we walked around in the Christmas market. Here are some impressions:

Prague Christmas Market Stall

This is what a typical stall looks like at the Christmas Market in Prague.

Sweets at Prague Christmas Market

A wide selection of (most probably) home made sweets. Yummy, but we didn’t buy any as we’d just eaten.

Church or Our Old Lady Befor Tyn, Prague

The very characteristic (and spooky) Church or Our Old Lady Before Tyn in the background of the Christmas Market in the Old Town Square

Me eating a sausage

You don’t go to Prague Christmas Market without trying the local delicacies – the sausage in a bun.

Before we went back to Pachtuv Palace Hotel we went for a walk to Charles Bridge which you can’t avoid crossing at some point when visiting Prague… That is of course unless you spend your whole holiday in the business district or in the new town shopping! We saw both beautiful and sad things, including quite a few beggars who beg in a different way compared to other countries. They sit on their knees and don’t bother you. Here’s a shot of the Christmas tourists standing on Charles Bridge with a beggar sitting on the side hoping for a few coins to be able to afford his supper:

A beggar on Charles Bridge

A beggar on Charles Bridge

At the same time we saw some very nice views from the bridge:

Northbound view from Charles Bridge, Prague. Is that the Jazz Boat?

Northbound view from Charles Bridge, Prague

Southbound view from Charles Bridge, Prague

Southbound view from Charles Bridge, Prague. One of those buildings on the left was our hotel.

Of course before we went to bed we needed something sweet, so what better place to go to than Phenix Cafe next to our hotel? My wife had a very nice cake whilst I of course had a Czech beer.

Chocolate Cake

Chocolate Cake at Phenix Cafe, just next to our hotel in Prague.

After a long day of travels and “Market-ing” we took a reasonably early night. Ready for the next day! I will provide another update with day 2 soon, so make sure to add my blog to your RSS feed so you can keep up! In the meantime check out the rest of the pictures from day 1 of our Prague Weekend Break.

Moods of Autumn Photo Shoot


I decided to bring my new Canon 5D MkII out for a test photo shoot the other weekend, with some encouraging results in the autumn light. I used the 24-105mm which normally comes as part of the kit. It was basically a nice stroll along the canal just outside our apartment in Rodley – I even got some tips from bypassers, but no good tips this time unfortunately.

The leaves hadn’t all turned yellow yet, but I did still capture some nice autumn photos, including some nice fresh and dried out plants/flowers and some swans. Hopefully these photos will start bringing out the moods of autumn and I’ll try to get some more whilst the leaves are still on the trees.

Photo of Swan in Rodley Leeds

Swans in Rodley, not far from our apartment. There's another swan behind and they're both having a nice autumn clean (although arguably swans spend much of their time on self grooming). 105mm, Aperture: F4.0, Shutter: 1/250s, ISO: 100


Purple Autumn Flower Photo

I managed to get a nice bokeh with this flower photo, and you can see the water dripping off the petal... nice! 105mm, Aperture: F6.3, Shutter: 1/100s, ISO: 200


Photo of bee collecting pollen from purple flower

I captured this little furry bee as he was trying to collect whatever was left of pollen before all the flowers die for the winter season. you can see it's so old that its hair has gone grey, just like with humans (or it could be pollen, who knows!). 105mm, Aperture: F8.0, Shutter: 1/100s, ISO: 320


Tall plants against blue sky background

Just like the bee, these plants are growing old and are enjoying the last of the sun before the frost comes and kills them off completely (arguably these plants are already dead). 105mm, Aperture: F14, Shutter: 1/160s, ISO: 100


As you can see from the last photo it was a great day to take pictures outside our apartment in Rodley, along the canal. If you like these photos you should also check out the other photos from this photo shoot

New Canon 5D MkII Arriving Soon


I’d like to give everyone a heads up that I’ve just ordered the Canon 5D MkII, a pro D-SLR which produces top notch photos (if you know how to shoot obviously), as well as HD video. I was considering the Canon 5d MkII vs. the newer Canon 7D, which has more gizmos and fun stuff, but landed on the 5D in the end due to its full frame sensor which provides higher quality photos. Then again it was more expensive as well…

Watch this space for the first shots from my new 5D… when it arrives! In the meantime here are some videos made using the 5d MkII:

Cross Polarising Photo Experiment


Today I’ve achieved psychedelic colours through cross polarisation in my cross polarising photo experiment. It’s really simple to do and doesn’t require expensive gear. All I used was:

  1. Canon EOS 400D D-SLR Camera (any camera can be used)
  2. The standard 18-55 kit lens that came with the camera (the only lens that fitted my polarizing filter
  3. Hoya Polarizing circular filter (can also use a normal polarising plastic or your polarised glasses)
  4. LCD monitor
  5. Some see-through tupperware and straws (you can use almost anything made of plastic)

Here are the results:

Photo of Cross Polarised Straws

The beautiful red colour in this abstract photo comes from full polarisation through a set of tied together straws, using an LCD monitor with a red background as a background. The photo has not had any post processing. 55mm, Aperture: F5.6, Shutter: 1s, ISO: 100

Cross Polarisation of Straws

Another shot of cross polarized straws with a wide aperture. You can see the straws' bends are in focus. The photo has not had any post processing. 55mm, Aperture: F5.6, Shutter: 1.6s, ISO: 100

Cross Polarised Photo of Tupperware Lid

This colourful abstract is actually a tupperware lid setup between the lens and a white background on the LCD monitor. The lines in the bottom left are actual scratches, as this lid has been used many a time! 55mm, Aperture: F5.6, Shutter: 1/6s, ISO: 100

You can find more great shots by going to my smugmug. They’ll work very well as desktop backgrounds!

Cross Polarising Tupperware Lid 2 Cross Polarising Photo of Straws

If you’re interested in how these photos were taken, see the shots below which explain how it’s done:

Polarisation Filter on LCD Monitor

1. Get a polarisation filter or plastic and fix it to your camera lens. When you use the polarising filter against a polarising light source (In this instance an LCD monitor), you get cross polarisation and the filter can actually block out the light from the LCD monitor.

Cross Polarising Photo Experiment Setup

2. Setup your camera on a tripod and direct it toward the monitor, using a white background. Setup a plastic object (in this case a tupperware lid) in between the camera and the LCD monitor and you've got your experiment all setup! Now twist your polarising filter to get different effects as seen in the photos above and on my Smugmug.

Cross polarising Photo Experiment setup with red background

3. Now you're setup, start experimenting with different objects and different colour backgrounds! This is the setup for my straw shots, where I used Scotch tape to attach the straws together.

You don’t need super gear to carry out this experiment, so nothing should stop you from running to the shop to get some polarising plastic and try this yourself! Please let me know if you’re carrying out the same experiment so I and other readers can see your creative routes.

Marina Sands, Singapore by Night Photos


Wow, it’s been a long time since my last post, and do you know why? I’ve gotten married and there’s a lot of time and effort gone into making that a success. But here I am again, firstly with some night shots from our recent trip to Singapore. As usual I brought my Canon 400D and my trusted lenses to capture some tropical urban beauty. And of course most importantly to capture the new megastructure Marina Sands, a hotel and casino complex consisting of 3 sky scrapers joined up by a “cruise ship” on top. My favourite shot was taken from the promenade in front of the Esplanade. And here it is:

Marina Sands, Singapore

The Marina Sands by night - loved and hated by Singaporeans (mostly hated), but you've got to admit it looks stunning at night. 24mm, Aperture: F14, Shutter: 30s, ISO: 100

We did also go up in the Swiss Hotel to get some nice overview shots of Singapore. The Swiss Hotel used to be the tallest building in Singapore with its 70+ floors’ restaurants and bars. Here are a couple of shots from the 70th floor, with the first one being of the river and Boat Quay and Clarke Quay:

Boat Quay and Clarke Quay seen from Swiss Hotel 70th floor

Singapore looks beautiful by night and especially the tourist areas of Boat Quay and Clarke Quay. 24mm, Aperture: F4.5, Shutter: 4s, ISO: 100

Finally there’s another view from the Swiss Hotel; one of Singapore’s many churches (Not sure whether this is Chimes, which is actually a popular party location – I’ll ask the wife!).

Church in Singapore

There are loads of Christians in Singapore. 58mm, Aperture: F4, Shutter: 1/4s, ISO: 800

I hope you like the results from our latest trip. I’ll be posting som more but in the meantime make sure you check out my Facebook page. 101 fans and counting – please “Like” the page if you like my photography!